By Phoenix Star Glass | 27 May 2024 | 0 Comments
Dab Rig Guide for Beginners
Dab rigs are water bongs for inhalingdry herbsconcentrates that are similar in appearance to regular water bongs (bongs), but are specifically designed to heat up concentrates (e.g. oils, resins, waxes, etc.) and convert them into vapor. Due to their high concentration, they provide an intense effect. Inhaling concentrate vapor directly can be very dry, hot, and uncomfortable, so a dab rig's powerful filtration and over-watering system is needed to minimize lung irritation while providing a purer and stronger taste experience. However, using a Dab Rig can seem a little complicated for beginners. This article will provide you with a detailed beginner's guide to help you get started easily.

Table of content:
Choosing the right dab device
As a beginner, the first important thing to do before starting your dabbing journey is to choose the right device. That may be a challenge for starter. Dab rig Kits offer a pre-configured solution that simplifies the selection process. Because they usually contain all the necessary accessories, such as the dab rig, nail or banger, downstem, mouthpiece, dab tool, Carb Cap, etc., there is no need to purchase each part separately, and the hassle of mismatching sizes or types between accessories is reduced. Additionally, dab kits typically offer more economical pricing compared to purchasing each accessory separately. They are often supplied by well-known brands, which ensures the quality of accessories.
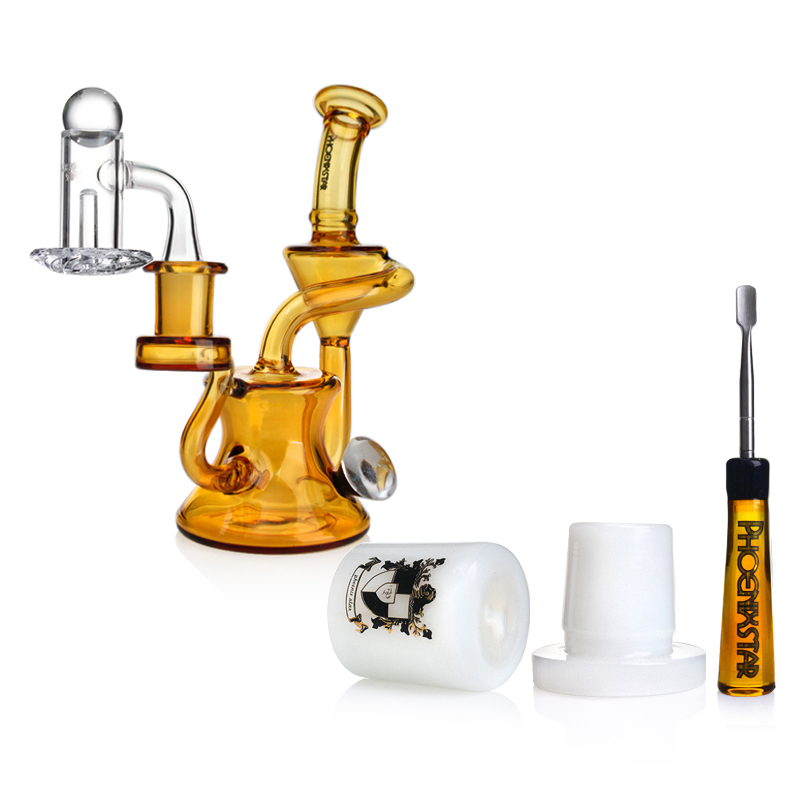
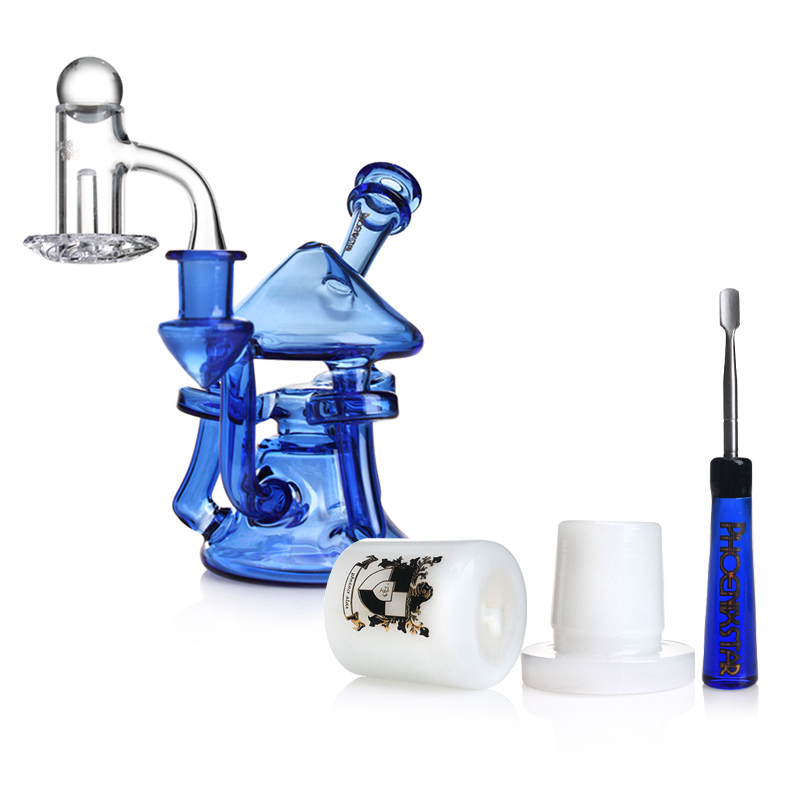
Phoenix Star has recently released several kits for beginners, which can be an alternative for entry-level dabbers, and the dab rig kits include:
Dab Rig Recycler, also known as recycling water pipes to provide a smoother and cooler smoking experience.
Full Welded Quartz banger
Carb Gap(Big ball), a lid for banger or nail
Two glass balls to enhance the filtration and cooling process
Storage jar for storing the concentrates
Metal&Glass Dabber for handling concentrates
Gift Box for gift-giving or storage of the dab rig components
Phoenix Star is renowned for its materials, originality, and quality. You can trust Phoenix, a manufacturer and seller with 17 years of experience in producing glass bongs and pipes.
Items to prepare before dabbing
If you have already purchased the dabbing device, you can now enjoy your dabbing session. Before you start, you need to prepare the following items:
·Dab Rig
·Dab Torch (for heating)
·dry herbs concentrates such as Wax Concentrates, Rosin, Live Resin, etc.
·Metal&Glass Dabber (for applying concentrates)
·Carb Cap (for controlling airflow and enhancing vaporization)
How to use a dab rig?
Step 1: Assemble the Dab Rig
1. Attach the Dab Rig's heating Nail or Banger securely to the body's connector; there should be no wobbling. A wobbly Nail or Banger will not only affect the effectiveness of use, but may also lead to accidental injury.
2. Add an appropriate amount of water to the water chamber of the Dab Rig, usually at a level that covers the water vessel (Downstem), not so high that the water will splash into your mouth when inhaling.
Step 2: Heat the Nail or Banger
1. Use a dab torch to heat the Nail or Banger to the proper temperature. Typically, this involves heating the Nail or Banger to an orange-red color. At this point, the temperature is approximately between 190°C and 205°C (375°F and 400°F), which is the temperature most dabbers consider appropriate for dabbing. Some dabbers may prefer lower temperatures for a milder experience and more flavor, while others may prefer higher temperatures for a more intense effect.
2. After heating, let the Nail or Banger cool for 5 to 30 seconds, depending on the temperature you want to achieve. Overheating the Nail or Banger may cause the concentrate to evaporate immediately without effectively converting to vapor, which will affect the quality and experience of the dab.
Step 3: Applying Dab
1. Use the Dab tool(dabber) to take the right amount ofdry herbsconcentrate. Beginners can start with a smaller amount and gradually increase it to the right amount for them.
2. Quickly apply the concentrate to the groove or recessed area in the center of the heated Nail or Banger and immediately cover the Nail or Banger with the carb cap to help control airflow and enhance vaporization.
Step 4: Inhaling Vapor
Inhale vapor through the mouthpiece of the Dab Rig. Make sure to inhale smoothly and avoid pushing too hard as this will minimize coughing or discomfort.
Take note of the following two points during use:
· Be careful when using a dab torch to heat a nail or banger to avoid fire or burns. Make sure you operate in an open and well-ventilated area.
· When using for the first time, start with a small amount of concentrate and gradually find the right amount for you. Avoid inhaling too much vapor at once, this can lead to excessive THC intake and cause discomfort.
Now that you've completed your first dab experience, the next step is to clean your dab rig to maintain its performance and prolong its life. Make sure your dab rig is clean before and after each use.
How do you clean your device?
First, disassemble your dab rig into its various parts, including the main body, the nail or banger, the downstem, the mouthpiece, and so on.
Rinse each part with warm water to remove loose residue. For tightly adhered residue, you can use a soft-bristled brush to gently scrub it.
For glass or ceramic parts, 91% or more isopropyl alcohol (alcohol) can be used as a cleaning agent.
For silicone parts, you can use mild soap and water, or a special silicone cleaner.
Pour the isopropyl alcohol into a large container and soak the glass or ceramic parts in it.
Using a special pipe brush or cotton swab, carefully clean every nook and cranny, especially hard-to-reach crevices.
For stubborn residue, add some table salt to isopropyl alcohol and soak the part in it. Gently rub the residue with the salt to help remove it.
Thoroughly rinse all parts with clean water to ensure there is no residual cleaner or salt.
Place cleaned parts on a clean paper towel or cloth to dry naturally, or use a clean paper towel or cloth to dry them.
Check that all parts are completely dry and free of residue before reassembling.

Table of content:
- Choosing the right dab device
- Items to prepare before dabbing
- How to use a dab rig
- How to clean your dab rig
Choosing the right dab device
As a beginner, the first important thing to do before starting your dabbing journey is to choose the right device. That may be a challenge for starter. Dab rig Kits offer a pre-configured solution that simplifies the selection process. Because they usually contain all the necessary accessories, such as the dab rig, nail or banger, downstem, mouthpiece, dab tool, Carb Cap, etc., there is no need to purchase each part separately, and the hassle of mismatching sizes or types between accessories is reduced. Additionally, dab kits typically offer more economical pricing compared to purchasing each accessory separately. They are often supplied by well-known brands, which ensures the quality of accessories.
Phoenix Star has recently released several kits for beginners, which can be an alternative for entry-level dabbers, and the dab rig kits include:
Dab Rig Recycler, also known as recycling water pipes to provide a smoother and cooler smoking experience.
Full Welded Quartz banger
Carb Gap(Big ball), a lid for banger or nail
Two glass balls to enhance the filtration and cooling process
Storage jar for storing the concentrates
Metal&Glass Dabber for handling concentrates
Gift Box for gift-giving or storage of the dab rig components


Phoenix Star is renowned for its materials, originality, and quality. You can trust Phoenix, a manufacturer and seller with 17 years of experience in producing glass bongs and pipes.
Items to prepare before dabbing
If you have already purchased the dabbing device, you can now enjoy your dabbing session. Before you start, you need to prepare the following items:
·Dab Rig
·Dab Torch (for heating)
·dry herbs concentrates such as Wax Concentrates, Rosin, Live Resin, etc.
·Metal&Glass Dabber (for applying concentrates)
·Carb Cap (for controlling airflow and enhancing vaporization)
How to use a dab rig?
Step 1: Assemble the Dab Rig
1. Attach the Dab Rig's heating Nail or Banger securely to the body's connector; there should be no wobbling. A wobbly Nail or Banger will not only affect the effectiveness of use, but may also lead to accidental injury.
2. Add an appropriate amount of water to the water chamber of the Dab Rig, usually at a level that covers the water vessel (Downstem), not so high that the water will splash into your mouth when inhaling.
Step 2: Heat the Nail or Banger
1. Use a dab torch to heat the Nail or Banger to the proper temperature. Typically, this involves heating the Nail or Banger to an orange-red color. At this point, the temperature is approximately between 190°C and 205°C (375°F and 400°F), which is the temperature most dabbers consider appropriate for dabbing. Some dabbers may prefer lower temperatures for a milder experience and more flavor, while others may prefer higher temperatures for a more intense effect.
2. After heating, let the Nail or Banger cool for 5 to 30 seconds, depending on the temperature you want to achieve. Overheating the Nail or Banger may cause the concentrate to evaporate immediately without effectively converting to vapor, which will affect the quality and experience of the dab.
Step 3: Applying Dab
1. Use the Dab tool(dabber) to take the right amount ofdry herbsconcentrate. Beginners can start with a smaller amount and gradually increase it to the right amount for them.
2. Quickly apply the concentrate to the groove or recessed area in the center of the heated Nail or Banger and immediately cover the Nail or Banger with the carb cap to help control airflow and enhance vaporization.
Step 4: Inhaling Vapor
Inhale vapor through the mouthpiece of the Dab Rig. Make sure to inhale smoothly and avoid pushing too hard as this will minimize coughing or discomfort.
Take note of the following two points during use:
· Be careful when using a dab torch to heat a nail or banger to avoid fire or burns. Make sure you operate in an open and well-ventilated area.
· When using for the first time, start with a small amount of concentrate and gradually find the right amount for you. Avoid inhaling too much vapor at once, this can lead to excessive THC intake and cause discomfort.
Now that you've completed your first dab experience, the next step is to clean your dab rig to maintain its performance and prolong its life. Make sure your dab rig is clean before and after each use.
How do you clean your device?
First, disassemble your dab rig into its various parts, including the main body, the nail or banger, the downstem, the mouthpiece, and so on.
Rinse each part with warm water to remove loose residue. For tightly adhered residue, you can use a soft-bristled brush to gently scrub it.
For glass or ceramic parts, 91% or more isopropyl alcohol (alcohol) can be used as a cleaning agent.
For silicone parts, you can use mild soap and water, or a special silicone cleaner.
Pour the isopropyl alcohol into a large container and soak the glass or ceramic parts in it.
Using a special pipe brush or cotton swab, carefully clean every nook and cranny, especially hard-to-reach crevices.
For stubborn residue, add some table salt to isopropyl alcohol and soak the part in it. Gently rub the residue with the salt to help remove it.
Thoroughly rinse all parts with clean water to ensure there is no residual cleaner or salt.
Place cleaned parts on a clean paper towel or cloth to dry naturally, or use a clean paper towel or cloth to dry them.
Check that all parts are completely dry and free of residue before reassembling.
Leave a Reply
Your email address will not be published.Required fields are marked. *